前言
根据我们上一篇文章,已经安装好了VuePress,但是具体该如何使用,如何优化以及自定义一些配置呢?
这篇文章我们会根据官方的文档来进行梳理归纳。
目录结构
想要了解它的运作原理,那么需要对整个目录有一个清晰的认识。
VuePress 遵循 “约定优于配置” 的原则,推荐的目录结构如下:

该目录结构为
v1版本,同样适用于v2
-
docs/.vuepress: 用于存放全局的配置、组件、静态资源等。 -
docs/.vuepress/components: 该目录中的 Vue 组件将会被自动注册为全局组件。 -
docs/.vuepress/theme: 用于存放本地主题。 -
docs/.vuepress/styles: 用于存放样式相关的文件。 -
docs/.vuepress/styles/index.styl: 将会被自动应用的全局样式文件,会生成在最终的 CSS 文件结尾,具有比默认样式更高的优先级。 -
docs/.vuepress/styles/palette.styl: 用于重写默认颜色常量,或者设置新的 stylus 颜色常量。 -
docs/.vuepress/public: 静态资源目录。 -
docs/.vuepress/templates: 存储 HTML 模板文件。 -
docs/.vuepress/templates/dev.html: 用于开发环境的 HTML 模板文件。 -
docs/.vuepress/templates/ssr.html: 构建时基于 Vue SSR 的 HTML 模板文件。 -
docs/.vuepress/config.js: 配置文件的入口文件,也可以是YML或toml。 -
docs/.vuepress/enhanceApp.js: 客户端应用的增强。
注意
当你想要去自定义
templates/ssr.html或templates/dev.html时,最好基于 默认的模板文件来修改,否则可能会导致构建出错。
模版内容:
<!DOCTYPE html>
<html lang="en">
    <head>
        <meta charset="utf-8">
        <meta name="viewport" content="width=device-width,initial-scale=1">
        <title></title>
    </head>
    <body>
        <div id="app"></div>
        </body>
</html>
同时阅读:
我们在这边可以将所有可能需要的目录都提前创建出来:
cd /path/to/vuepress/docs
mkdir guide
cd .vuepress
mkdir .vuepress
mkdir components
mkdir theme
mkdir public
mkdir styles
mkdir templates
默认的页面路由
| 相对路径 | 路由地址 |
|---|---|
/README.md |
/ |
/index.md |
/ |
/contributing.md |
/contributing.html |
/guide/README.md |
/guide/ |
/guide/getting-started.md |
/guide/getting-started.html |
提示
默认配置下,
README.md和index.md都会被转换成index.html,并且其对应的路由路径都是由斜杠结尾的。然而,如果你想同时保留这两个文件,就可能会造成冲突。
基本配置
配置文件 config.js
VuePress 站点的基本配置文件是 .vuepress/config.js ,但也同样支持 TypeScript 配置文件。你可以使用 .vuepress/config.ts 来得到更好的类型提示。
vim /path/to/vuepress/docs/.vuepress/config.jsimport { defineUserConfig } from 'vuepress'
export default defineUserConfig({
lang: 'zh-CN',
title: '你好, VuePress !',
description: '这是我的第一个 VuePress 站点',
})客户端配置
目录结构:
├─ docs
│  ├─ .vuepress
│  │  ├─ client.js   <--- 客户端配置文件
│  │  └─ config.js   <--- 配置文件
│  └─ README.md
├─ .gitignore
└─ package.json
创建一个基础的配置文件:
vim /path/to/vuepress/docs/.vuepress/client.js内容为:
import { defineClientConfig } from '@vuepress/client'

export default defineClientConfig({
  enhance({ app, router, siteData }) {},
  setup() {},
  rootComponents: [],
})
常用配置
主页配置
docs/README.md 其实就相当于你的主页内容,我们这边进行相应的修改一下,内容为:
---
home: true
heroImage: /favicon.png
heroText: Allen's Blog
actions:
  - text: 博客简介
    link: /guide/
    type: primary
  - text: 作者简介
    link: /guide/
    type: secondary
features:
- title: Note
  details: Markdown-centered notes that record every moment succinctly and efficiently
- title: Blog
  details: Clean and tidy blog, easy to archive files
- title: Document
  details: Online personal documentation, make the desired documentation
footer: MIT Licensed | Copyright © 2016-present Passwordgloo
---| 名称 | 含义 |
|---|---|
| home | 判断是否是首页 |
| heroImage | 首页logo图 |
| heroText | 首页标题 |
| actions | 按钮,text和link可以多个 |
| features | 文档分栏,title和details数量自定 |
| footer | 文档底部板块 |
现在访问站点,已经变得完全不一样了:
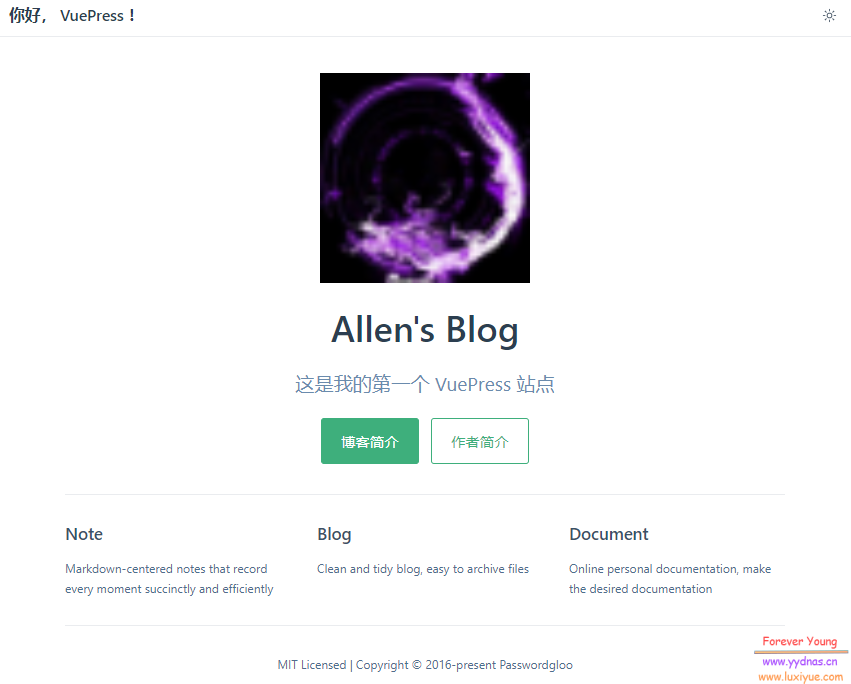
logo丑了点,无伤大雅
页面配置
---
lang: zh-CN
title: 页面的标题
description: 页面的描述
sidebar: auto
---
Markdown文件开头可以设置YAML Frontmatter,代码两端使用
---隔开使用
sidebar:auto自动显示侧边栏标题
config.ts配置
.vuepress文件夹内新建config.ts,官方推荐使用typescript编写
编辑 .vuepress/config.ts
vim /path/to/vuepress/docs/.vuepress/config.ts内容如下:
//引入默认主题
import { defaultTheme } from '@vuepress/theme-default'
export default {
    theme: defaultTheme({

    navbar: [
      // 嵌套 Group - 最大深度为 2
      {
        text: '简介',
        children: [
          {
            text: 'SubGroup',
            children: ['/group/sub/foo.md', '/group/sub/bar.md'],
          },
        ],
      },
      // 控制元素何时被激活
      {
        text: '分类',
        children: [
          {
            text: 'Always active',
            link: '/',
            // 该元素将一直处于激活状态
            activeMatch: '/',
          },
          {
            text: 'Active on /foo/',
            link: '/not-foo/',
            // 该元素在当前路由路径是 /foo/ 开头时激活
            // 支持正则表达式
            activeMatch: '^/foo/',
          },
        ],
      },
    ],
  }),
}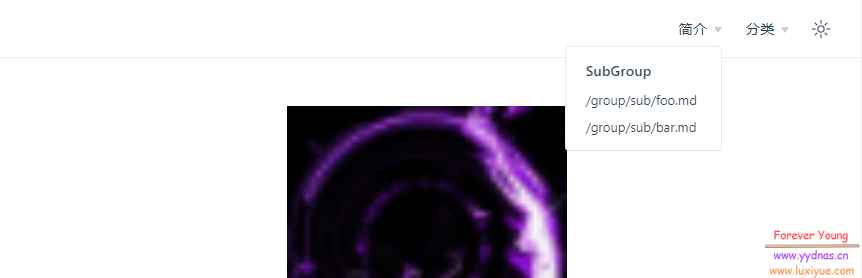
这样你的导航栏也完成了。
最后
暂时先写到这里吧,将上面这些东西配置好后,其实你的网站已经很好看了,再多的优化细节,等我以后看看要不要把博客转过来再来探讨。
目前也只是体验一下,而且网上关于这方面的教程不是很多,感觉VuePress更多的可能还是与程序员适配性会更高一下,因此,我是非常不建议新手直接上手VuePress。